How to Install a Balcony Solar System in One Afternoon (Step by Step)
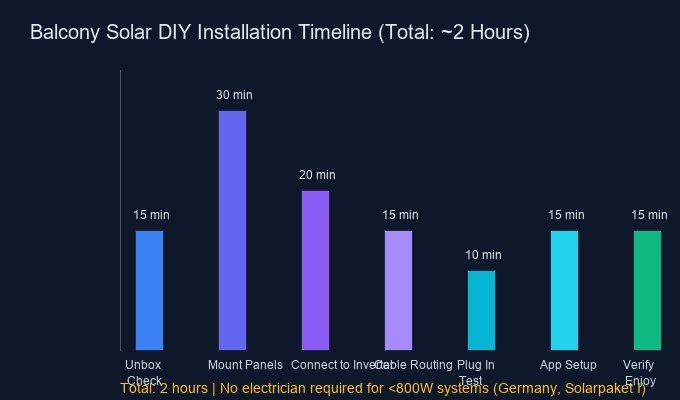
You don't need a professional electrician, a roof, or a weekend of work to start generating your own solar power. With today's plug-and-play balcony solar kits—like the GEECO 800W Balcony System—you can install a complete setup in about two hours using basic tools. Here's how to do it in an afternoon.
According to Germany's Federal Network Agency, over 1.23 million balcony solar systems were registered by mid-2025, and the German government's Solarpaket I legislation raised the plug-in limit from 600W to 800W—explicitly allowing DIY installation without landlord veto. You can join them this afternoon.
What You'll Need — Pre-Installation Checklist
Before touching a single panel, gather everything in one place. The most common cause of a stalled installation is realizing midway that you're missing a simple tool.
- Balcony solar kit: Panels (typically 2 × 400W), micro inverter, mounting brackets, and AC cable—all included in the GEECO kit.
- Basic tools: Adjustable wrench, Phillips screwdriver, level, measuring tape. That's it.
- Safety gear: Work gloves (panels have sharp edges) and safety glasses.
- Weather check: Choose a dry, calm day. Rain + ladder + balcony = unnecessary risk.
- Regulation check: Confirm your country allows plug-in solar. Germany, Austria, Netherlands, and France all permit systems ≤800W. In the UK, self-installation is anticipated to become legal from July 2026 after the BSI product standard is confirmed.
Pro tip: Unbox everything indoors first. Count all parts against the manual—it saves an hour on the balcony later.
Step 1: Choose the Best Spot for Maximum Sun
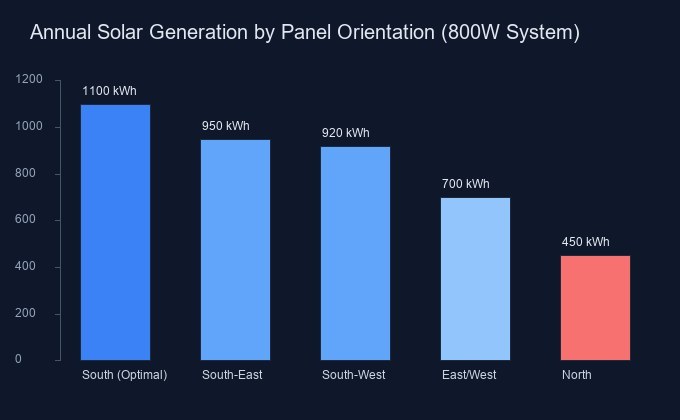
Orientation is the single biggest factor in how much electricity you'll generate. An 800W system facing due south produces approximately 1,100 kWh per year in central Europe—enough to offset roughly 30% of a typical apartment's electricity bill. The same system facing north? Only about 450 kWh. The chart above shows annual generation by orientation for an 800W system.
Stand on your balcony at midday and check for shading: neighboring buildings, overhanging eaves, large trees. Even partial shading on one panel can drag down the entire string's output—unless you're using micro inverters with per-panel MPPT (Maximum Power Point Tracking), which GEECO micro inverters provide. With per-panel MPPT, a shaded panel doesn't hurt its neighbor.
- Best: South-facing, no shade, 30-40° tilt.
- Good: South-east or south-west with morning/afternoon sun.
- Acceptable: East/west split—two panels facing opposite directions for all-day generation.
- Avoid: North-facing unless you have no alternative; expect ~40% of optimal output.
Step 2: Mount the Panels on Your Balcony Railing
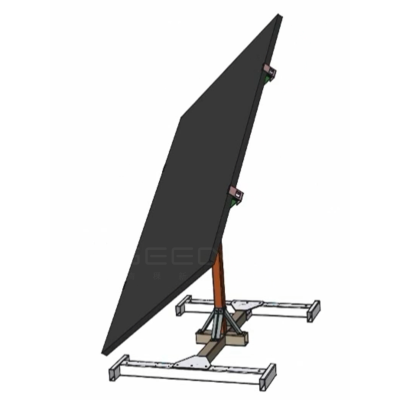
This is the most physical part—and the one where rushing leads to mistakes. Most modern balcony kits use universal clamp brackets that grip standard railings without drilling. GEECO's bracket system supports round, square, and flat railings up to 60mm thick.
- Attach brackets to panels first—on the ground, where you can tighten everything properly. Each panel typically needs two brackets.
- Position the brackets on the railing at the desired height. Use your level to check alignment before tightening.
- Hand-tighten, then wrench-tighten. The goal is firm—not brute-force. Over-tightening can warp the bracket or damage the railing.
- Double-check stability by gently pushing the panel from multiple angles. If it wobbles, re-tighten.
Honest risk note: If your balcony railing is old, rusted, or structurally uncertain, do not mount panels on it. The combined weight of two 400W glass panels (~25 kg) plus wind load can stress weak railings. If in doubt, use a freestanding floor mount or consult a structural engineer. Safety is always priority one.
Step 3: Connect Panels to the Micro Inverter
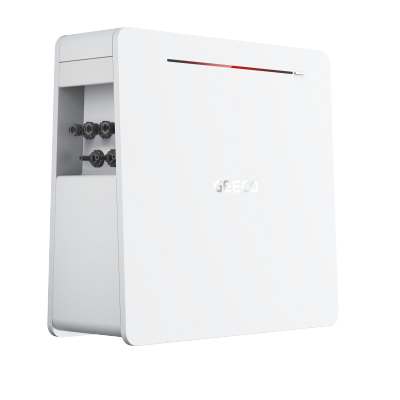
This is where the magic happens: DC power from your panels meets the micro inverter, which converts it into usable AC. The GEECO GE2000 uses industry-standard MC4 connectors—color-coded, click-to-lock, impossible to reverse.
- Locate the two sets of DC input cables on your micro inverter (one per panel).
- Match the MC4 connectors: positive to positive, negative to negative. You'll hear an audible click when they seat correctly.
- Secure cables along the railing with included cable ties. Loose cables in wind = noise and wear.
- Keep the micro inverter in a shaded, ventilated spot—behind a panel is ideal—since direct sun shortens its lifespan.
A 2024 VDE study found that loose DC connectors were the #1 cause of underperformance in DIY balcony installations—accounting for 23% of service calls. The fix is simple: tug each connector after clicking it in. If it holds, you're good.
Step 4: Plug In, Power Up, and Configure the App
The moment of truth. Route the AC cable from your micro inverter to the nearest indoor outlet. Use the included cable clips to secure the route—no loose cables hanging off the balcony. Plug into a standard Schuko (Type F) socket for EU systems.
Once plugged in, the micro inverter performs a self-test: it checks grid voltage, frequency, and anti-islanding protection. This takes 30-90 seconds. The LED indicator will turn solid green when it's ready to generate.
Now install the monitoring app. For GEECO systems, download GEECO Smart from your app store:
- Open the app and create an account with your email.
- Tap "Add Device" and scan the QR code on your micro inverter.
- The app auto-detects your panels and starts displaying live generation data within 60 seconds.
- Set your electricity tariff in the app settings to see real-time savings in your currency.
Built-in anti-backflow: If you're in a zero-export scenario—common in Germany under VDE-AR-N 4105—the GEECO inverter's built-in anti-backflow kicks in automatically. It detects reverse power flow in under 0.01 seconds and throttles output to match your consumption. No external limiter, no extra wiring, no utility paperwork. This is the single biggest time-saver versus older systems that need separate export-limitation hardware.
Step 5: Verify Everything Is Working
Don't just trust the green LED—verify with data. Here's your 5-point checklist for the first hour:
- Live power reading: The app should show a positive wattage within 2 minutes of plugging in. On a sunny day, expect 500-750W from an 800W system.
- Per-panel output: If one panel shows significantly lower output than the other, check its orientation and shading—or re-check the MC4 connection.
- No error codes: Common GEECO codes: E01 (grid voltage out of range—wait 5 minutes), E03 (communication lost—check app connection).
- Anti-backflow test: Turn off a major appliance and watch the app. Output should drop within seconds as the inverter detects reduced consumption.
- Daily total: After your first full day, compare your generation to the PVGIS estimate for your location. You can access the free PVGIS tool at re.jrc.ec.europa.eu/pvg_tools.
Mini case: A Munich apartment renter installed a GEECO 800W balcony kit on a south-west facing balcony in March 2026. First-day generation: 3.8 kWh. By month three, the system had produced 92 kWh—covering 28% of his household electricity and saving approximately €28/month at German residential rates (€0.30/kWh as of Q1 2026). Total installation time: 1 hour 50 minutes.
Common Mistakes and When to Call a Pro
Even the best guide can't prevent every pitfall. These are the top issues we see in support tickets:
| Mistake | Consequence | Fix |
|---|---|---|
| Mounting panels before checking railing strength | Structural failure, safety hazard | Consult engineer or use floor mount |
| Loose MC4 connectors | Arcing, power loss, fire risk | Tug-test every connection; listen for click |
| Skipping the parts inventory | Stuck mid-install waiting for a missing bolt | Check parts against manual before starting |
| Plugging into a non-dedicated circuit | Circuit overload, nuisance tripping | Dedicate one outlet to solar if possible |
| Ignoring firmware updates | Missing anti-backflow improvements, grid compliance updates | Enable auto-update in GEECO Smart app |
When to call a professional: If you encounter persistent E01 grid errors, if your balcony railing needs reinforcement, or if local regulations require a certified electrician to sign off on the installation, don't hesitate. The money you save on DIY isn't worth a safety incident or a compliance violation. In Germany and Austria, electricians typically charge €100-180 for a 30-minute inspection.
Is DIY Balcony Solar Right for You?
If you have a balcony, basic hand-tool competency, and a south-ish orientation, the answer is probably yes. The numbers are compelling: a €400-800 kit (GEECO, Hoymiles, or similar) typically pays for itself in 4-7 years through electricity bill savings, and the hardware lasts 25+ years. That's 18+ years of free electricity after breakeven.
But balcony solar isn't for everyone. If you live on a ground floor with heavy shade, if your rental agreement prohibits exterior modifications, or if you're planning to move within a year, the payback math doesn't work. Be honest with yourself about the commitment—the environmental karma is real, but so is the upfront cost.
For most apartment dwellers in Europe in 2026, the calculus is simple: high electricity prices, mature technology, friendly regulations, and genuinely DIY-able installation. GEECO's plug-and-play philosophy—make solar as simple as plugging in a toaster—isn't marketing fluff. It comes from engineering every component for DIY: pre-configured inverters, tool-free brackets, color-coded connectors.
Your first watt of self-generated solar changes how you think about energy. It transforms from an abstract bill into something you can track and control from your phone. That shift matters more than any single kilowatt-hour.